I’ve had this obsession for years of owning a drinks globe. It was just one of those things I’d love to own. The problem was, they’re quite expensive and I couldn’t justify getting one for the office. Bar a few drinks here and there, it would be nothing more than a prop for the meeting room!
That is until I found one on Amazon for £70 delivered.
As you might have guessed, a great price tag didn’t automatically make the globe useful. Sure it added a bit of old world glamour to the meeting room, but it we never used it - it was just gathering dust in the corner.
Disenfranchised with the globe, we’d stumbled on an awesome Kickstarter campaign: Bartendro. Everyone was immediately hooked - not only drinks, not only a robot, but a drinks robot? We snapped up the kit as soon as they started selling online.
Then came the discussion about the coolest way to set it up. We went through many ideas - a mad scientist’s lab, a giant fox dispenser, a couple of tubes attached to a roomba - ranging from impractical to absolutely nuts.
The kit arrived before we had any idea what to do with it. One day, while discussing the robot, we’d looked over at the globe. Eureka! It was obvious what we had to do: an drinks globe that poured your drink for you.
Perfect for the modern gentleman and gentlewoman. After all - pouring your own drink is so 10 years ago.
How we built it
Disclaimer:
None of us have even so much as put up a shelf before, so our approach to building this is a true hack. (quite literally: at one point everyone in the team had a go at trying to remove a wooden panel by hacking away at it with screwdrivers). If you’re an expert maker and your blood boils at the thought of a bunch of software developers butchering the fine art of woodwork, this article isn’t for you!
With that said heres a list of things you’ll need to build one yourself:
The Specialist Equipment:
- 7 x Bartendro Dispensers
- Food safe tubing (come with the dispensers)
- Bartendro Router Board
- Power Supply 24v - 200W (with custom adapter)
- Drinks Globe
The Techy Stuff:
- Raspberry Pi
- USB Wifi Dongle
- SD Card
- Network cables
For Construction:
- A drill with a wide drill-bit
- Brass tubing to make a tap
- Rubber bands to ensure a snug fit for the tubing
- Around 10m of Velcro with adhesive on the back
- A (preferably nice-looking) box to hold your board
- CD markers (for keeping everything labeled)
The drinks:
-
In the pumps:
- Vanilla Vodka
- Tequila
- Rum
- Cointreau
- Gin
- Orange Juice / Tropical Juice
- Grenadine
-
On the side:
- Raspberry and Passionfruit Purees
- Sugar Syrup
- Club Soda
- Mint
- Lemons & Limes
The Process
The process is rather simple: we managed to put the whole thing together and refine the construction over 2 days, with 5 people working on it. Mind you, about 40% of those days were spent testing out the cocktail recipes!
1. Prepping the globe
The first step is to remove the bottom piece of wood from the body of the globe. This was a bit of a challenge: we couldn’t cut through it with any of the tools we had in the office, and there was a fair amount of glue around the edges preventing us from levering it out. In the end, we drilled it full of holes and cracked it open.

With this panel removed, the next step was to drill holes in the bottom of the globe, where the tubes come through to reach the bottles. As we used seven pumps, we went with three holes of about 3.5cm in diameter. This allowed us to easily fit 2 to 3 tubes through each hole. It’s important to space this according to where your pumps are fitted so that the tube from each pump takes the straightest path possible to reach the bottle.
We also drilled a hole through the top layer, in the center of the thick section which faces the joint of the lid. This is where the pipe comes out to pour the drink. This hole had to be just slightly larger than the diameter of the coper pipe that was going to be the pouring spout of the drinks robot.

2. Hardware & Setup
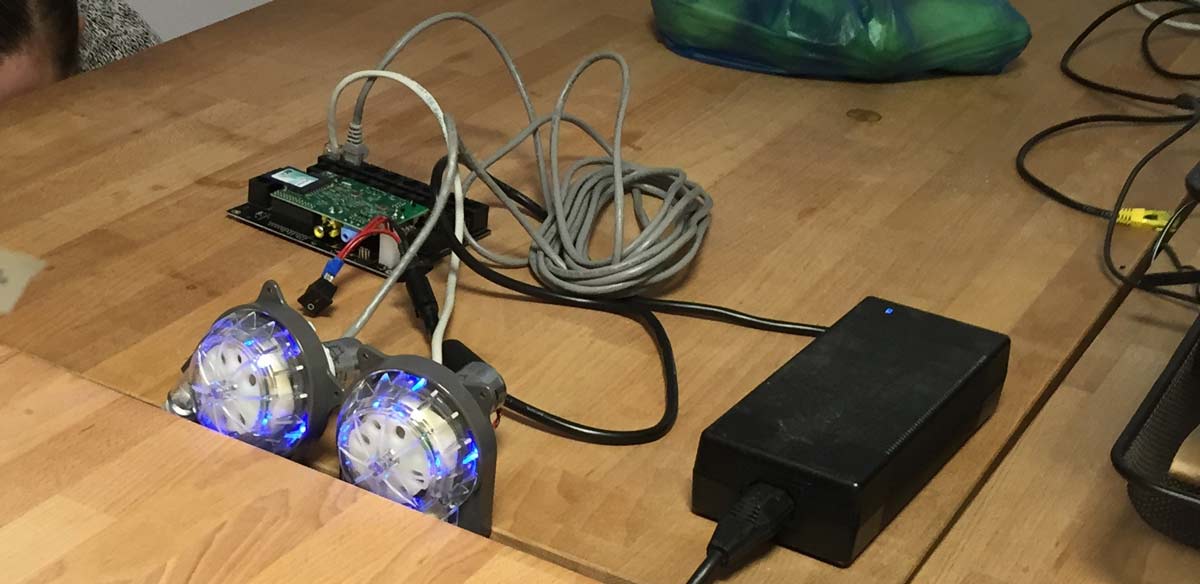
Whilst a few of us worked on this, Alessandro and Alex worked on the hardware sides of things. The first step was to test everything. We had to wire up the pumps and make sure all of them worked.
Since the space in the globe is very limited, we had to make sure we had ethernet cables that were just the right length to fit snugly between the board and the pump. Alex used his previous life’s experiences to teach Linnea and Alessandro how to make ethernet cables. It brought back a lot of memories of living in server cabinets and underneath desks for Alex that were probably best left in the past.
We won’t bore you with the exact details of how to set up the board: Bartendro has documentation online explaining how to go about it. The bartendro software is a little buggy and needs a fair amount of hand holding. We’re working on rewriting the API at the moment and will follow up with another post once we’ve finished.
Known Issues
- The Board seems to store the ID of each pump and relate it to the ethernet port it has been plugged into. We had been switching pumps around during testing, which led to the bartendro software not being able to find the pumps. The best way to prevent this is to label all your pumps and ethernet cables with numbers before plugging them in. The only way to fix this is to wipe the SD card and reload the OS.
3. Mounting the pumps

In the first incarnation of bartendro, we were hanging the pumps off of the edge of the middle layer with small blocks of wood screwed onto the pumps.
However, after more consideration, we decided that velcroing the base of each pump to the middle layer was a much better solution. While this meant we wouldn’t have anywhere to store the glasses, it left plenty of room for the tubes and the board to fit inside the globe.

4. The tap
We made the tap out of bits of copper piping. This had to be measured to ensure that it would fit under the lid after closing it, and cut to the right size with a hack saw. The tap is held in place with what’s called a Coupling Compression Fitting, with a couple of rubber seals in between to ensure a snug fit.

It’s important to only cut the tubing from the tap once you’re absolutely sure everything works. If you end up having to take out a pump you will have to replace all the tubes if you cannot get the tube back into it’s original position.
5. Wiring it all up

Each pump has two tubes coming out of it - one for suction and one for dispensing. After fitting the tubing on all the pumps and velcroing them in place, we lowered the suction tubes down through the holes in the base of the globe.
We then threaded the dispending tubes through the tap. This was easier to do after taping all the tubes together with masking tape and pushing them all through at once. Finally, we used a scalpel to cut the tubes so that they were flush with the end of the tap.
We found a small cardboard box that was a perfect fit for the board. We cut a window in the top of it that allowed us to reach the ethernet ports.
It’s important to keep the ethernet ports facing away from the center - you don’t want the tap dripping onto your board!

You can then run the main power cable through one of the holes in the bottom of the globe and plug your board into a socket. The only thing left to do is a nice plate under the tap and get ready to enjoy some cocktails!
Things to remember
- Make sure there are no tight bends in the tubes: otherwise the liquid gets stuck.
- Label everything! Suction and dispensing tubes, the pump, ethernet cables and bottles all need to share a number. Once the system is up and running, you’ll be able to set the alcohol type against the number of your pump.
- Test everything before you put it in place! We had troubles with one of our bartendro boards and ended up having to order a replacement. Faulty pumps, ethernet cables or board components can be a nightmare to replace once everything is in it’s place.
- One of the key things with building real life products (much the same as software projects) is to test as regularly as possible. There are so many unknowns with projects that reenforcing your assumptions with tests makes for a better product.
Naming a Robot
We asked our twitter followers for suggestions on what to name our drinks robot.
The winning suggestion Fantastic Mixer Fox came from a mashup of all the suggestions combined.
Other suggestions included: Foxtail, Foxbot, Fantastic Mister Foxbot, The Foxtender, The Foxinator, Fox-o-matic, Robocup, Serious Bot, Robofox & The Foxer
What’s left to do
While we’re very happy to have built a great-looking home for Fantastic Mixer Fox, we’ve got many more plans for him in the future.
- Get a nice hammered brass plate for the glass to rest on
- Find the perfect drinks menu that doesn’t require shaking or stirring
- Create a menu app that let’s us order drinks without having to use the (kind of ugly) default bartendro interface
- Strapping a Hackable Roomba to the bottom and creating the most amazing invention concieved by man! (Ok maybe not this. Maybe)
Have any other suggestions? We’d love to hear what you think.
We’re only just getting started on making Fantastic Mixer Fox the best bartender in the world.
But in the meantime - Cheers!